Design Planning, Schedule and Software
As I embark on the development of my immersive Camper Van Project, the planning phase is critical to ensure that each component aligns with the project’s goals and timeline. This post covers the UX flow, app and website design, 3D modelling and 360-view planning, AR integration strategy, marketing and social media plans, and the Gantt charts for time management. Here’s a detailed look into how I’m structuring each part of the project.
UX Flow Plan: Mapping the User Journey
The foundation of any successful app is a seamless user experience (UX). I began this stage by crafting a detailed UX flow diagram to visualize how users will interact with the app. My main goal is to keep navigation simple and intuitive, ensuring users can easily access key features, such as the 3D camper van models and virtual tours, without unnecessary complexity.
The user journey starts at the Home Screen, where users can choose between different sections:
The Camper Van Projects section is divided into two sub categories, each designed to enhance the user’s browsing and exploration experience of available camper van models.
1. Model Overview: This subcategory offers users a comprehensive view of available camper van models. Users can browse various models and examine detailed specifications, features, and customization options for each. This allows prospective buyers to explore options based on their preferences and requirements.
2. Virtual Tour: Within this subcategory, users are provided with immersive exploration tools. They can choose between a 360-degree interior view of models from past projects or opt to view a 3D model of a van within their own physical environment. These virtual tours are designed to give users an authentic sense of space, layout, and features, enhancing the decision-making process by offering a real-time, interactive experience.
Updates Section
The Updates section enables users to track the latest developments related to their camper van projects, including progress on customizations and the current stage within the buying process. This section ensures transparency and keeps the user informed, strengthening customer satisfaction and engagement by providing regular updates.
Profile Section
In the Profile section, users can manage their personal information and interaction history within the app. This includes saved van models, preferred features, and scheduled virtual demonstrations. By allowing users to customize and organize their profiles, this section provides a personalized experience that supports seamless access to their favorite models and scheduled activities.
By structuring the app this way, the UX flow ensures users can easily find what they’re looking for without getting lost in the interface. This layout will be the basis for wireframes and later usability testing to ensure the navigation feels intuitive and fluid.

App and Website Example Design: Enhancing Accessibility
After finalizing the UX flow, I moved on to designing the potential app interface and accompanying website. Both platforms are designed to mirror each other visually and functionally, ensuring a cohesive experience for users regardless of how they choose to engage.
App Design:
The mobile app is focused on showcasing the camper vans in an engaging and interactive way. I’ve drafted potential high-fidelity wireframes, emphasizing a minimalistic yet visually impactful design. Key features of the app include:
Clear Visuals of Camper Van Models: The app prominently displays 3D camper van models, allowing users to explore them in detail. Each model will be accompanied by essential specifications and information, helping users make informed decisions.
Interactive AR Features: Users can easily access AR functionalities by scanning QR codes within the app or from printed materials. Once scanned, they’ll be able to place a 3D version of the camper van into their real-world surroundings. This feature is intended to enhance the buying experience, allowing potential buyers to visualize the van in different environments like their driveway or camping grounds.
User-Friendly 360-Tour Interface: The app also features a smooth and responsive 360-degree tour interface, where users can immerse themselves in the camper van’s interior. The tour will offer a complete view of the van’s layout, letting users explore from one area to another with ease.
Simple Navigation Menus: The design prioritizes simplicity, with intuitive navigation menus that allow users to easily access different sections, including camper van projects, AR experiences, and virtual tours. The goal is to minimize the learning curve for users while maximizing engagement.
Website Design:
For the website, I’ve created a responsive layout that works seamlessly on both desktop and mobile devices. The goal is to provide users with flexibility, whether they prefer browsing on a larger screen or on the go. Key features of the website include:
Interactive Homepage Banner: The homepage will greet users with an interactive banner, highlighting key features of the camper van models. It will include links to the AR app, virtual tours, and a “Book a Demo” button for those wanting to schedule in-person viewings.
Detailed Product Pages: Each camper van model will have its own dedicated page. These pages will feature an in-depth description of the van, including specifications, available add-ons, and customization options. Users will also be able to interact with a 3D model of the van and begin a 360-degree virtual tour directly from the product page.
Seamless Integration with AR and App: Like the app, the website will allow users to easily access AR features through embedded QR codes and links to download the mobile app. This integrated approach ensures that whether a user engages via mobile or desktop, they can switch between experiences effortlessly.
Both the app and website designs focus on clean visuals, intuitive navigation, and an immersive, interactive user experience. By ensuring consistency between the two platforms, I’m aiming to create a cohesive journey where users can transition smoothly between exploring camper van models, interacting with AR, and taking virtual tours.

3D Modelling and 360 View Plan: Bringing the Vans to Life
Next, I began planning for the 3D modelling of the camper vans. This part of the project is crucial as it forms the visual centerpiece of the app and website. Here’s my step-by-step plan for developing the models and the 360 view:
- 3D Modelling: Using Blender, I’ll try to create detailed 3D models of the camper vans. Each model will be highly realistic, featuring intricate details such as the exterior design, tires, windows, and the roof, as well as the fully furnished interiors. This will include creating objects like seating, kitchen areas, and storage units, ensuring the models are accurate representations of real-life camper van designs. I’ll also implement texture mapping to enhance the realism of materials, such as metal, fabric, and wood.
- 360 View Plan: Once the 3D models are completed, I will generate 360-degree views of both the exterior and interior of the camper vans. This will allow users to rotate the model freely and explore all angles. The plan involves rendering high-quality panoramic images of the van interiors, ensuring smooth transitions when users move from one section to another in the virtual tour. I am also exploring options for hotspot interactions, where users can click on specific areas (e.g., the kitchen sink) to receive more detailed information or customization options.
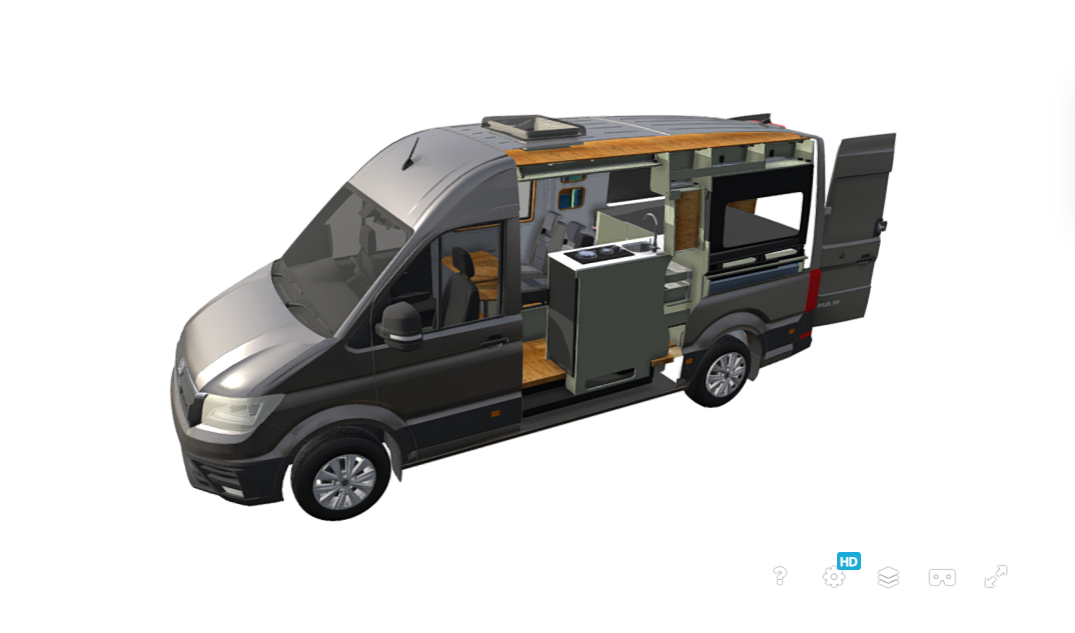
As I plan my approach to creating the 3D models of the camper vans in Blender, I’ve found inspiration from various existing 3D models of similar vehicles. The image below illustrates a design approach that I’m aiming to replicate focusing on highly detailed, realistic renderings of camper van interiors and exteriors.
The model in the reference image features clean lines, high-quality textures, and a realistic presentation of both the interior furnishings and the van’s structure. This level of detail will be crucial for my 3D models, especially as users will be interacting with these designs closely, either through the 360-degree tour or the AR features.
The key elements I plan to adopt include:
- Exterior Design: Creating detailed textures and materials to represent metal, glass, and rubber accurately, ensuring the exterior looks polished and realistic.
- Interior Furnishings: Including functional details like seating arrangements, appliances, and storage spaces that represent a true-to-life camper van experience.
- Lighting and Rendering: Using proper lighting techniques to create an immersive feel, especially for the interior spaces. This will be essential for creating a realistic atmosphere in the 360-degree virtual tour.
AR Features Integration: Expanding the User Experience
A key part of the project is the integration of AR features. After careful research, I’ve outlined the following plan for integrating AR into the app:
QR Code Activation: Users will scan a QR code either from a brochure or a webpage to instantly bring a 3D version of the camper van into their real-world surroundings.
AR Visualization: The AR experience will allow users to place the camper van in various environments (e.g., their driveway, a camping site), giving them a sense of how the van would look in the real world. They will be able to walk around the van and zoom into key features.
Customization in AR: One of the features I’m excited about is the potential for customization within the AR experience. I plan to incorporate options where users can change the exterior colours of the camper van or swap out furniture inside the van’s interior. This level of personalization could allow users to experiment with different layouts, colour schemes, and setups, helping them envision their ideal camper van before making a purchase decision.
However, while this feature would significantly enhance the user experience, I also recognize that it presents a big challenge in terms of development time. The complexity of creating dynamic, customizable 3D models and integrating these options into the AR framework is substantial. Given my schedule, I’ll need to carefully evaluate whether I can realistically complete this feature within the available timeframe.
If I find that it’s too ambitious for this project, I may scale down the customization options or postpone their inclusion for future iterations. For now, I’m considering different approaches to see if I can simplify the process without sacrificing too much of the user experience.
I will use Unity for the AR development, ensuring compatibility with both Android and iOS devices. My focus is on creating an AR experience that enhances decision-making for buyers by letting them visualize the van in their own space.
Figure 4: Examples of AR in marketing.
Figure 4.1: Best Examples of AR in marketing with 360 experience.
Both videos demonstrate how social media and AR can work together effectively. I could potentially incorporate a similar approach in my project, using AR features to engage users through social media platforms. This could help create interactive content that encourages users to explore the camper van models and share their experiences, further promoting the app.
Marketing and Social Media Plan: Reaching the Right Audience
Effective marketing will be essential to promoting the app and website. Here’s how I plan to reach the right audience:
Social Media Campaigns: I’ll focus on platforms like Instagram and Facebook, where the camper van and outdoor adventure communities are highly active. Posts will showcase the AR experience, highlight user interactions with the 360-degree virtual tours, and encourage followers to engage with polls or stories related to camper van customization options.
Influencer Collaboration: Partnering with camper van influencers and outdoor enthusiasts on social media could help increase visibility. Influencers can try out the app and share their experiences, giving their followers a first-hand look at the AR and virtual tour features. This collaboration could help reach a wider audience and build trust among potential buyers.
*Both image references can be found in reference list under number 6.
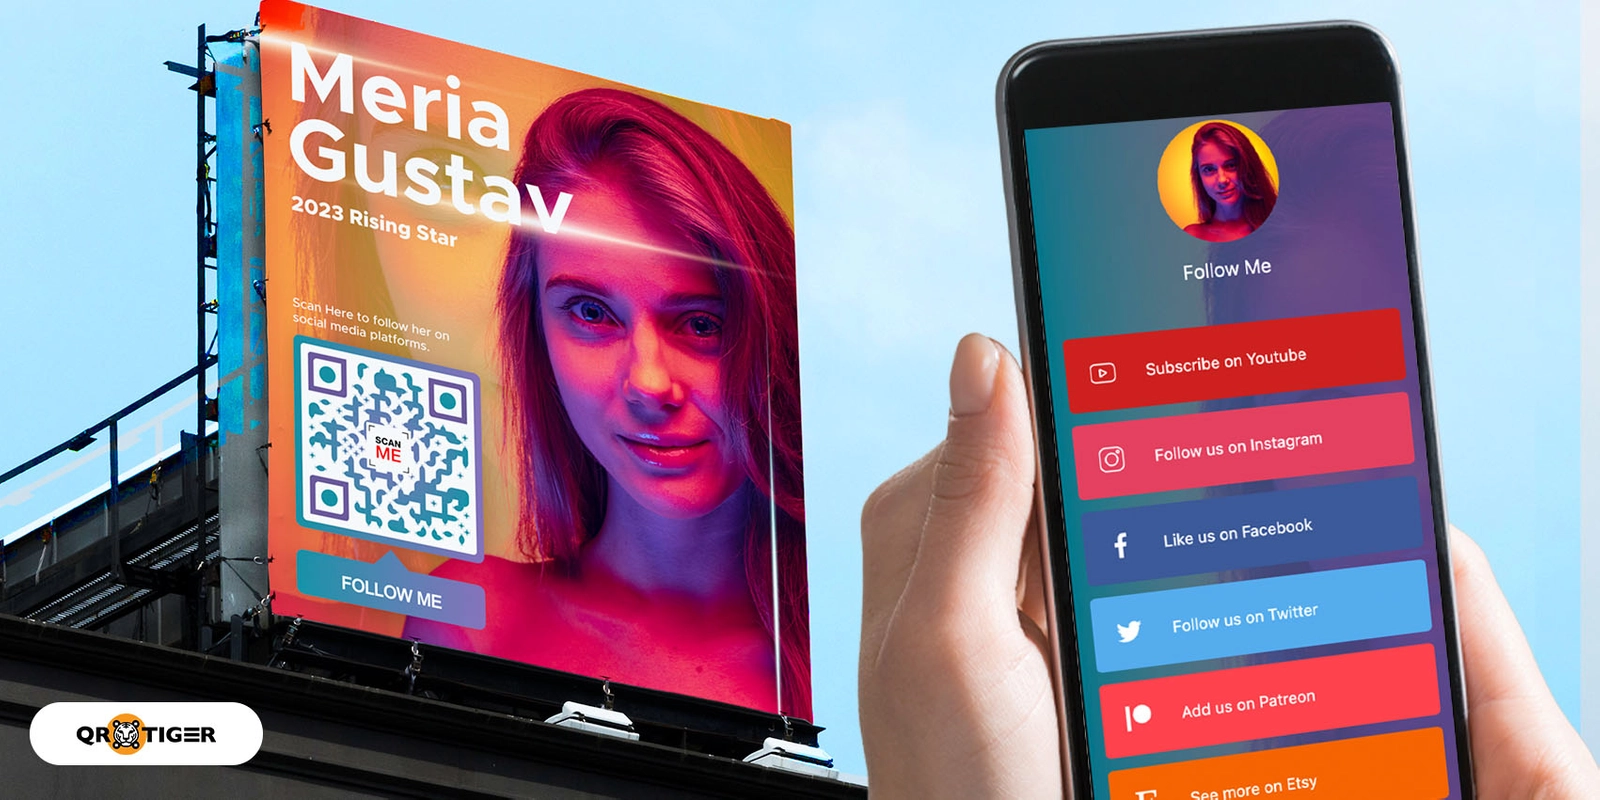
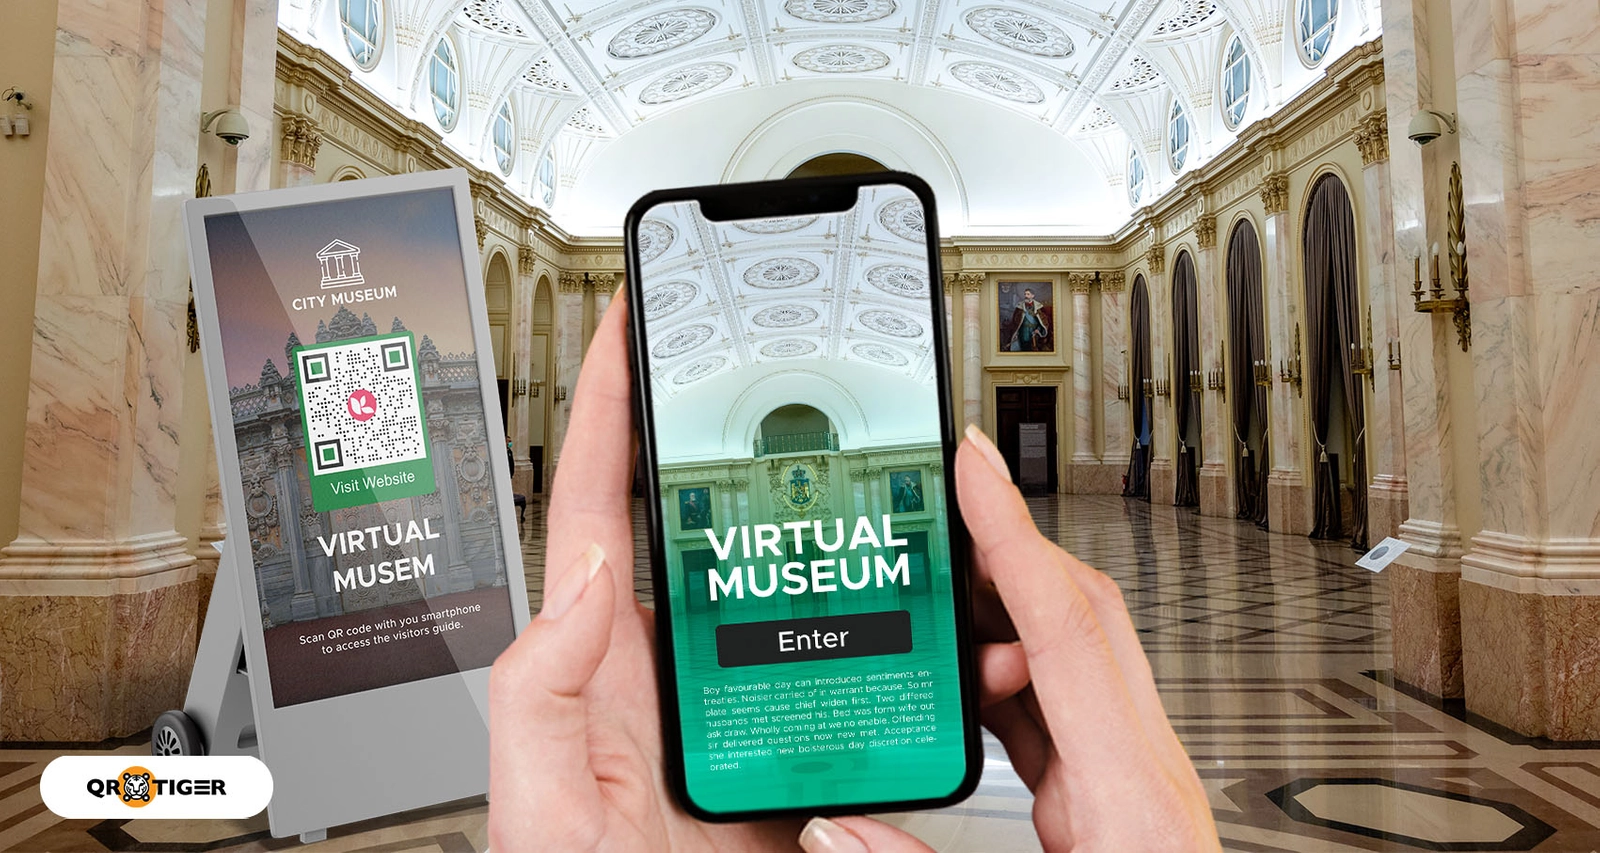
Inspired by how museums and exhibits enhance visitor interaction using QR codes on standees and posters, I’m planning to implement similar features in my AR/VR Camper Van project. QR codes will serve as an easy access point for users to engage with the AR and virtual tour features directly from their mobile devices. Here are a few ways I envision incorporating QR codes into the project:
Standees at Showrooms and Events: At physical camper van showrooms or industry events, I could design standees featuring a QR code linked to the AR experience. By scanning the code, attendees can instantly visualize a 3D model of the camper van and even explore customization options like changing colours or swapping furniture. This will bring the van to life in real-time, creating an immersive experience right there in the showroom.
Posters for Marketing Campaigns: As part of the marketing strategy, posters could be distributed both online and in physical spaces, such as outdoor adventure shops, trade fairs, or camper van dealerships. The posters would feature a QR code that directs users to the virtual tour or AR experience. This allows potential buyers to engage with the camper van at their convenience, no matter where they are.
Brochures and Flyers: Similar to posters, smaller brochures or flyers with QR codes could be handed out at events or mailed to interested customers. These codes would link to specific features such as the 360-degree virtual tour or individual camper van model pages, making it easy for users to interact with the project from their mobile devices.
Website Integration: On the project’s website, the QR codes could be embedded within the product pages. For users visiting the website on a desktop, they can scan the code with their phone and continue exploring the 3D or AR features on mobile.
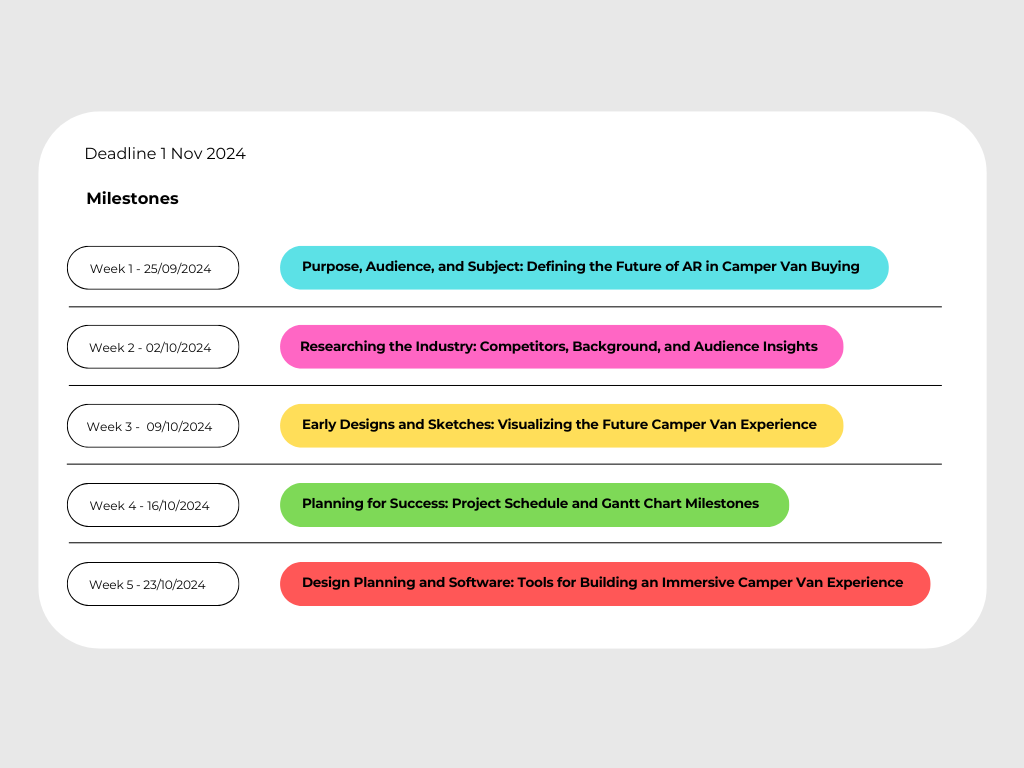
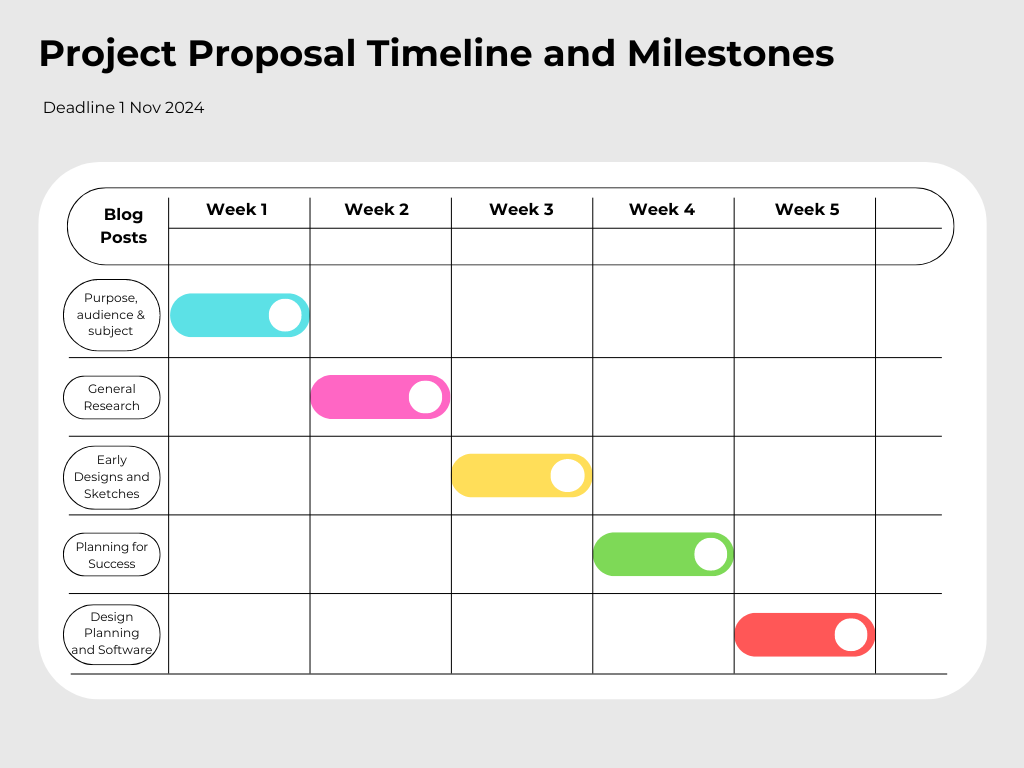
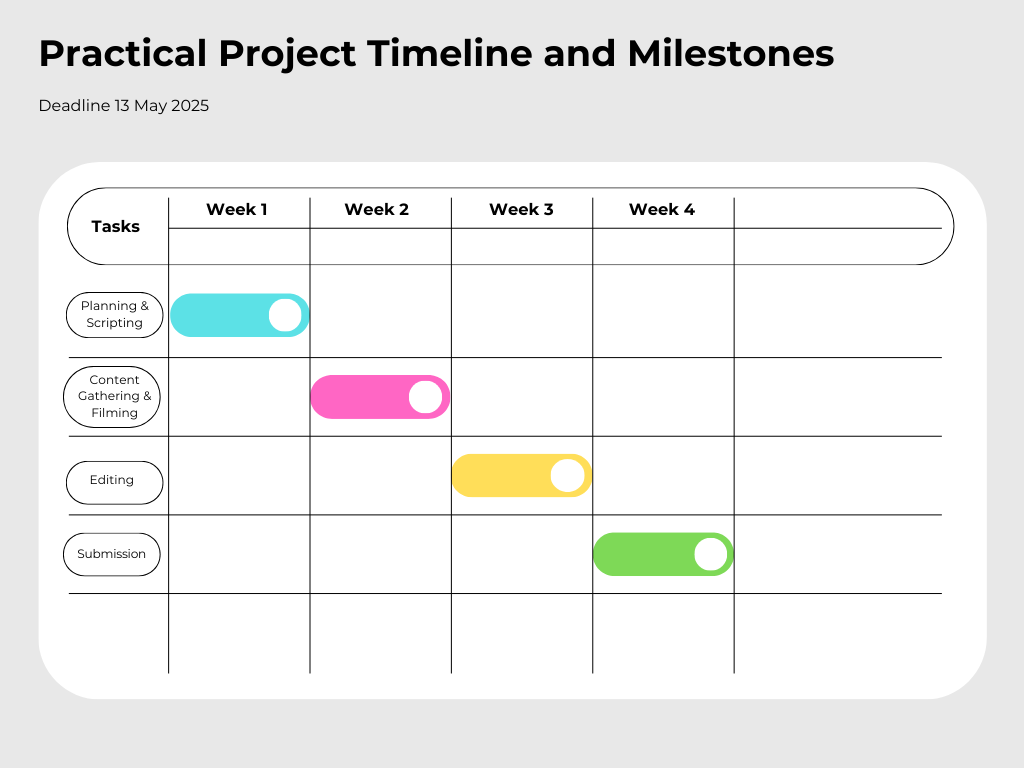
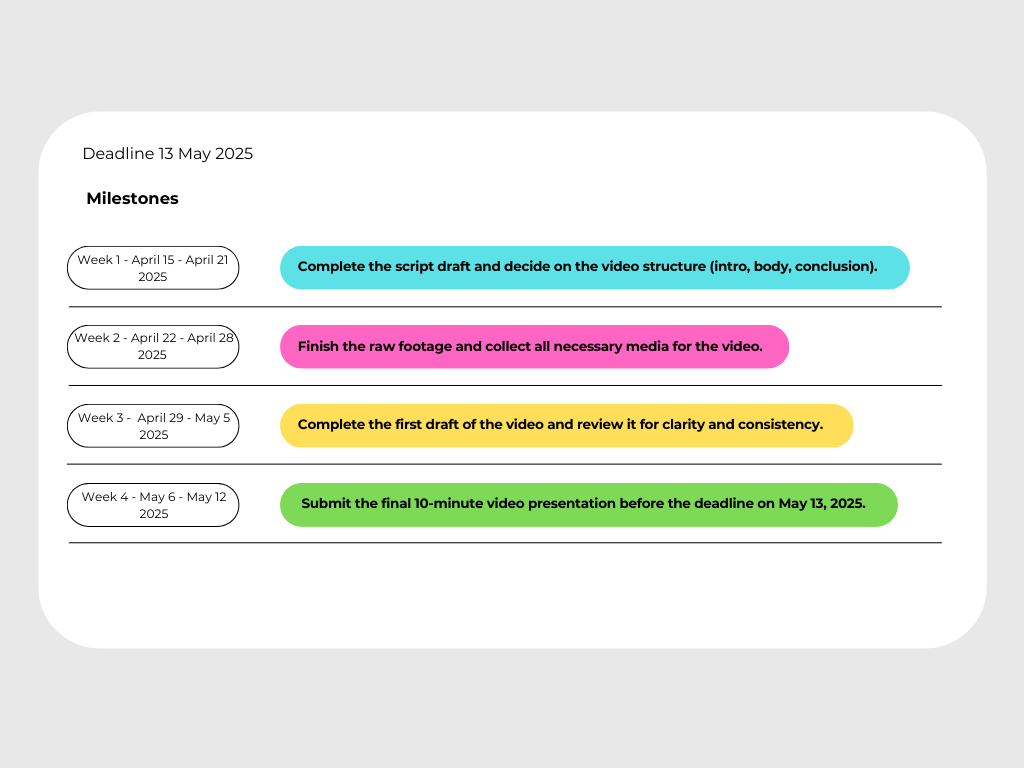
Gantt Charts and Software Planning: Staying on Track
Time management is critical to ensure that the project progresses smoothly and meets all deadlines. To manage this, I’ve developed a detailed Gantt chart that outlines each phase of the project, from the initial design and UX planning to the final stages of marketing and app launch. The Gantt chart serves as a visual roadmap, helping me keep track of deadlines, monitor progress, and adjust timelines when necessary.
By breaking down each phase into smaller, manageable milestones, I’m able to ensure that I maintain consistent progress throughout the project. Regular check-ins with the Gantt chart will help identify any potential delays or bottlenecks early, allowing me to adjust the schedule as needed.
Software Tools:
To bring the project to life, I’ll be using a combination of powerful software tools that cover all aspects of development:
- Blender: This is my primary tool for creating the 3D models of the camper vans. Blender allows me to build detailed, high-quality models that will be used in both the virtual tour and AR experiences. The software’s flexibility will also help with rendering realistic textures, lighting, and environments.
- Unity and Zappar: For AR integration, I’ll rely on Unity and Zappar. Unity will handle the core AR functionality, allowing me to bring the 3D models to life in real-world environments. Zappar will further assist in making the AR experience easily accessible through QR codes, linking the virtual vans with user devices.
- Adobe XD: Adobe XD is my primary tool for app and website design. It allows me to create wireframes, prototypes, and high-fidelity designs, ensuring that the user interface is intuitive and visually appealing. By using Adobe XD, I can quickly iterate and refine the design as needed.
- Trello: For task management and collaboration, I’ll use Trello to organize and track each phase of the project. Trello’s visual board system helps me stay organized by creating lists for tasks, deadlines, and milestones. I can also use it to prioritize tasks and manage workload efficiently.
- Gantt Chart: To visually map out the project timeline, I’m using Canva to create the Gantt chart. Canva’s design tools allow me to customize the chart and make adjustments as needed, providing a clear, easy-to-follow timeline for the entire project.
Potential Challenges:
While the project plan is thorough, there are a few potential limitations that I need to consider as the development progresses:
Time Constraints: Given the complexity of developing an AR/VR experience and integrating multiple features such as 3D models, customization, and a 360-degree virtual tour, time management is crucial. There’s a possibility that some features, like the customization options, might need to be scaled back or postponed due to tight deadlines. I’ll need to be flexible and prioritize core functionalities to meet the project deadlines.
Technical Challenges in AR Integration: AR development, particularly with customization features, presents a steep learning curve. The integration of features like changing van colours or furniture may prove more challenging than anticipated. If technical obstacles arise, I may need to simplify these aspects or explore alternative solutions that still offer an engaging user experience.
Resource Limitations: As this project involves a variety of tools and platforms (Blender, Unity, Zappar, Adobe XD), there may be limitations in terms of software capabilities, particularly with managing large 3D models or ensuring smooth AR functionality across devices. Ensuring the app works seamlessly across different platforms and mobile devices will require rigorous testing, which may demand more time and resources than planned.
User Adoption and Engagement: While AR and VR technology is becoming more popular, not all users may be familiar with how to use these tools. Simplifying the experience and ensuring that it’s easy to access via QR codes is key, but there’s still a risk that some users might find the technology challenging or might not engage fully with the AR features.
Summary:
The primary limitation I foresee in this project involves the complexity and time investment required for 3D modelling and the 360-degree virtual experience. These components demand extensive technical skills and are likely to consume a considerable amount of time, especially given the learning curve associated with the software. Additionally, balancing this project alongside other assignments imposes further time constraints, making it challenging to effectively manage all elements simultaneously.
Moreover, developing a fully refined product across all areas 3D modelling, AR integration, app development, website creation, and marketing would be unfeasible within the current timeframe. Consequently, I’ll prioritize the core aspects: 3D modelling, the 360-degree view, and the app. After careful consideration, I have decided to exclude the website design as it would be more convenient for buyers to access the app directly on their phone, allowing for greater accessibility anytime, anywhere.
During my additional research, I discovered Vanspace 3D, a specialized online modelling software developed specifically for van conversions. I plan to invest in using Vanspace 3D, as it includes pre-set models for various van makes, along with premade templates for cabinets, beds, fridges, and even decorative elements like cushions and plants. Its intuitive drag-and-drop interface allows me to test layout options immediately, making it much quicker to use than general design software like SketchUp, which requires a steep learning curve and lacks purpose-built van conversion tools. Within an hour of using Vanspace 3D, I was able to create and test a layout, highlighting its efficiency for my project needs.
Figure 9: Vanspace 3D Tutorial | Design Your First Van by Vanspace 3D (2023)
By focusing on these core deliverables and leveraging tools like Vanspace 3D, along with an AI-based platform like Meshy for creating 3D models, I aim to achieve a high standard for the final product without spending excessive time on modeling. This approach allows me to allocate more time to other critical components of the project, ensuring a balanced and efficient workflow. Utilizing these specialized platforms will streamline the 3D modeling process, enabling me to maintain focus on essential deliverables while keeping the project within the timeframe.

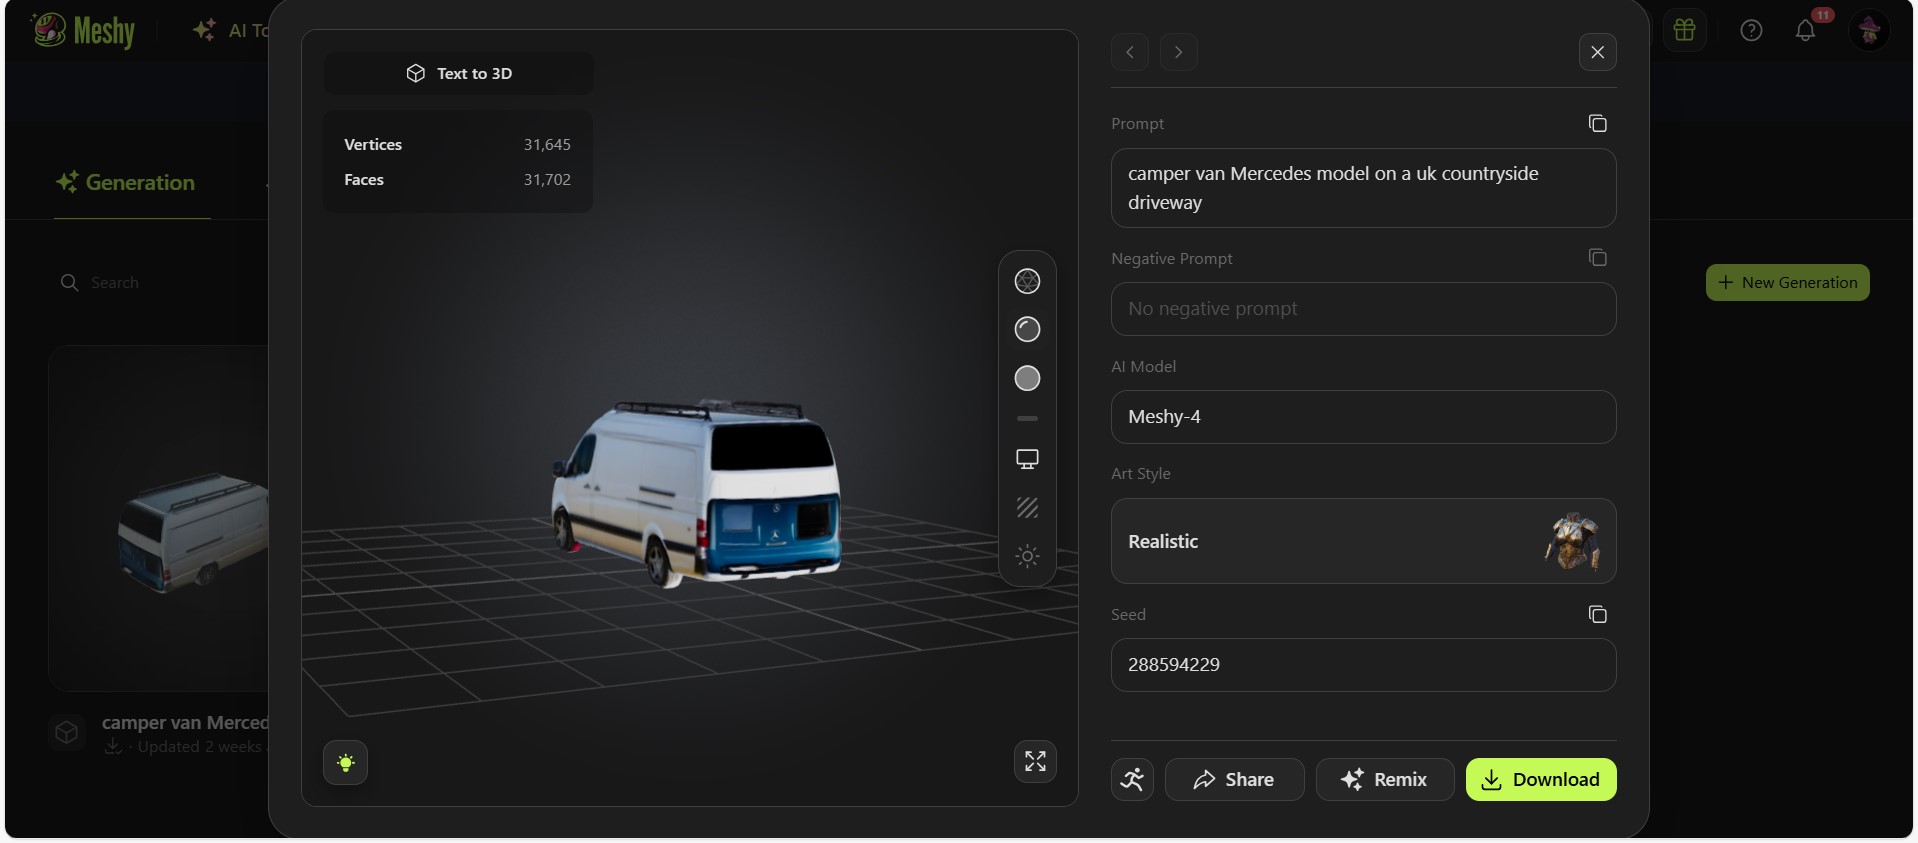
Figures 10 and 11 illustrate my initial attempts to create a 3D camper van model using the AI platform, Meshy. While the model shows potential, certain aspects particularly the back of the van appear misaligned, giving the impression that it might be part of a different model. Due to this inconsistency, I am reconsidering whether this particular design will be suitable for the final project.
Conclusion:
In conclusion, my major project proposal aims to create an immersive, accessible, and user-centric experience for prospective camper van buyers. By integrating 3D modelling and augmented reality features within a mobile app, I intend to modernize the camper van purchasing process, allowing users to explore and customize models in detail from anywhere. This approach prioritizes user convenience, enabling buyers to make informed decisions without the need for physical showroom visits.
The project has evolved significantly through class feedback, collaborative idea refinement, and careful consideration of available tools. Incorporating insights from peers and instructors has helped me streamline my initial vision, focusing on creating a realistic and achievable scope within the project timeline. Decisions to exclude a website in favour of a mobile-first approach and leverage software like Vanspace 3D and Meshy have been guided by a commitment to maintaining a high standard of quality while addressing technical and time constraints.
With the groundwork set and a clear direction established, this proposal represents a forward-thinking step in the camper van industry, blending innovation with practicality to meet the evolving needs of consumers. Moving forward, I am confident that this project will serve as a valuable contribution to both my academic growth and the larger field of digital solutions in vehicle marketing.
Reference list:
Images that are used in the app design 1,4,5.
- Martina Ciardi. (2022). Grey Campervan MWB Crafter 3D Model-Side Cut out. Available at: Crafter 3D models – Sketchfab [Accessed 09 Oct 2024].
- Mbryonic (2019) Best Augmented Reality Marketing Experiences 2019 [Video]. (8) Best Augmented Reality Marketing Experiences 2019 – YouTube [Accessed 9 Oct 2024].
- Meshy (2024). Generate 3D Models from Images and Text. Available at: Meshy [Accessed 25 Oct 2024].
- RINKI (2019) Examples of Augmented Reality (AR) in Marketing [Video]. (8) Examples of Augmented Reality (AR) in Marketing – YouTube [Accessed 09 Oct 2024].
- Square Space. (n.d.). QR Code Transparent Isolated PNG. Available at: qr code png – Search Images (bing.com) [Accessed 09 Oct 2024].
- Two Wandering Soles. (2024). Van Conversioon Ideas: Design Inspiration for Your Campervan Build | Two Wandering Soles. Available at: Pin page (pinterest.com) [Accessed 09 Oct 2024].
- Vall V. (2024) 40 Best Innovative Uses of QR Codes. [Image]. QR Tiger. Available online at: 40 Best Innovative Uses of QR Codes (qrcode-tiger.com) [Accessed 09 Oct 2024].
- Vanspace 3D (2023) vanspace 3D Tutorial | Design Your First Van [Video]. vanspace 3D Tutorial | Design Your First Van [Accessed 31 Oct 2024].